
| Note: | Work in progress, documentation is incomplete and partly outdated. |
|---|---|
| Note: | Development takes place on the next branch on github, code and documentation (this readme) may be more up to date there. |
Overview
DDPrint adds process control to FDM printer.
The process that is to be controlled is the process of extruding plastic.
The extrusion system includes the feeder, a bowden tube (*) and the hotend with its heater, lets call this system the extruder.
Most FDM printers have no feedback on the extruder part of the printer - they are running open loop.
That means to find the balance of printing speed (better: volumetric flow) and hotend temperature is difficult. Another problem of this open loop extrusion system is that the printer cannot react when the hotend has difficulties to deliver the current demand of flow (for example when printing the first layer or when the hotend is not hot enough yet).
To close the control loop we add a sensor to measure the performance of the extruder und use this data to control the temperature of the hotend and the speed of the printer.
The control loop is closed in two ways, an acvitve way where the speed of the printer is lowered if the hotend cannot deliver the demanded flowrate and the feeder begins to slip. The other is a feed forward way: The flowrate sensor is used to measure the characteristics of a given filament - extruder combination. The result of this measurement is a so called material profile.
Control of hotend temperature is called autotemp.
Control of printer speed is done with the temperature-limiter and the flowrate-limiter .
(*) For the moment bowden style printers only.
Inhalt
- Overview
- Flowratesensor
- Bowden style printers only?
- Material Profiles
- Auto Temp
- Temperature limiter
- Flowrate limiter
- More in detail
- ** Following stuff has to be reviewed **
- FDM 3d printer firmware with host preprocessing and closed loop E
- Github Mirror, project Homepage
- Current state
- Key features
- Installation
- Configuration
- Gcode input
- Usage, Commandline Interface
- Usage, Userinterface (TUI)
- Some implementation notes
- Things todo, nice to have
- Thanks
- Unsorted
- Log
Flowratesensor
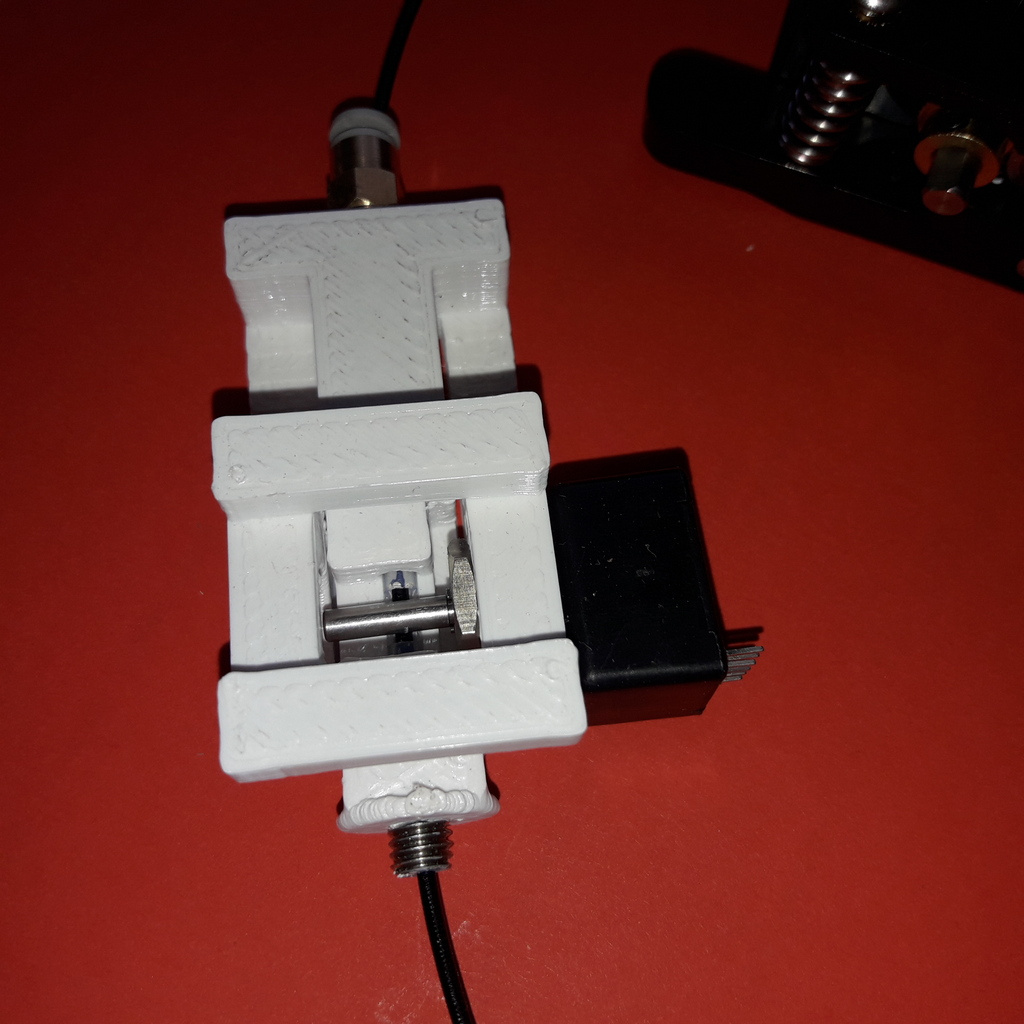
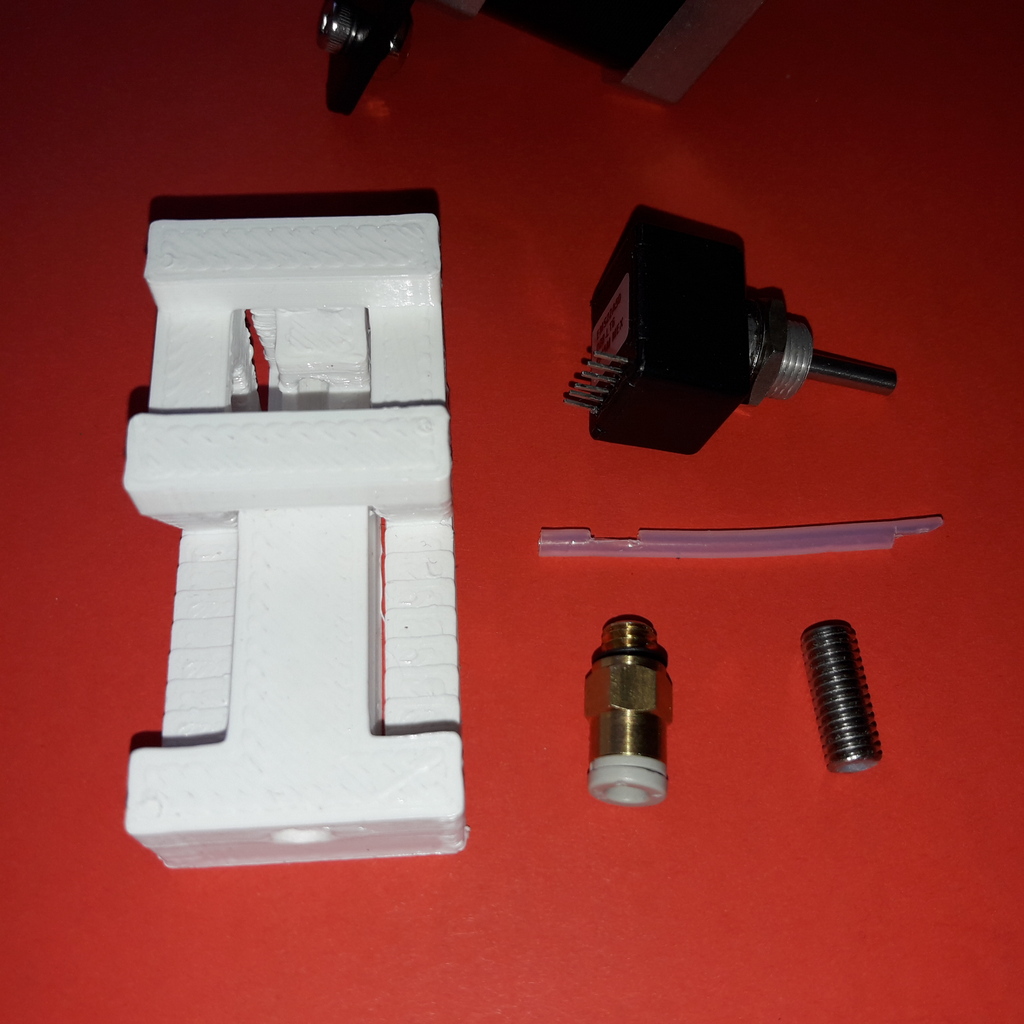
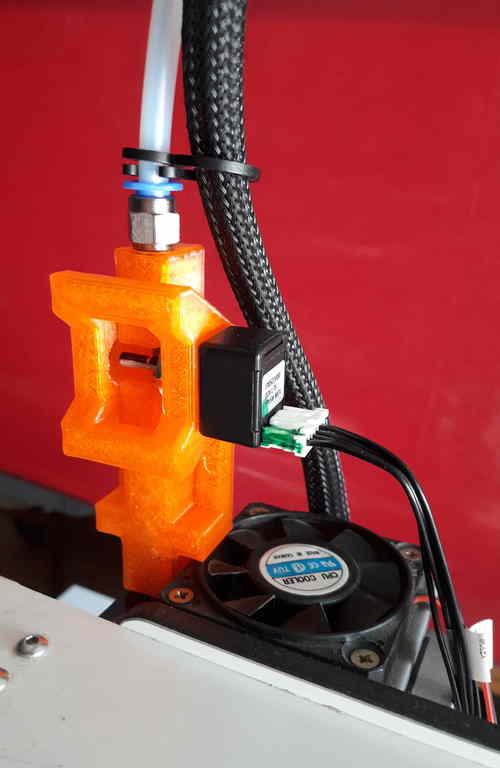
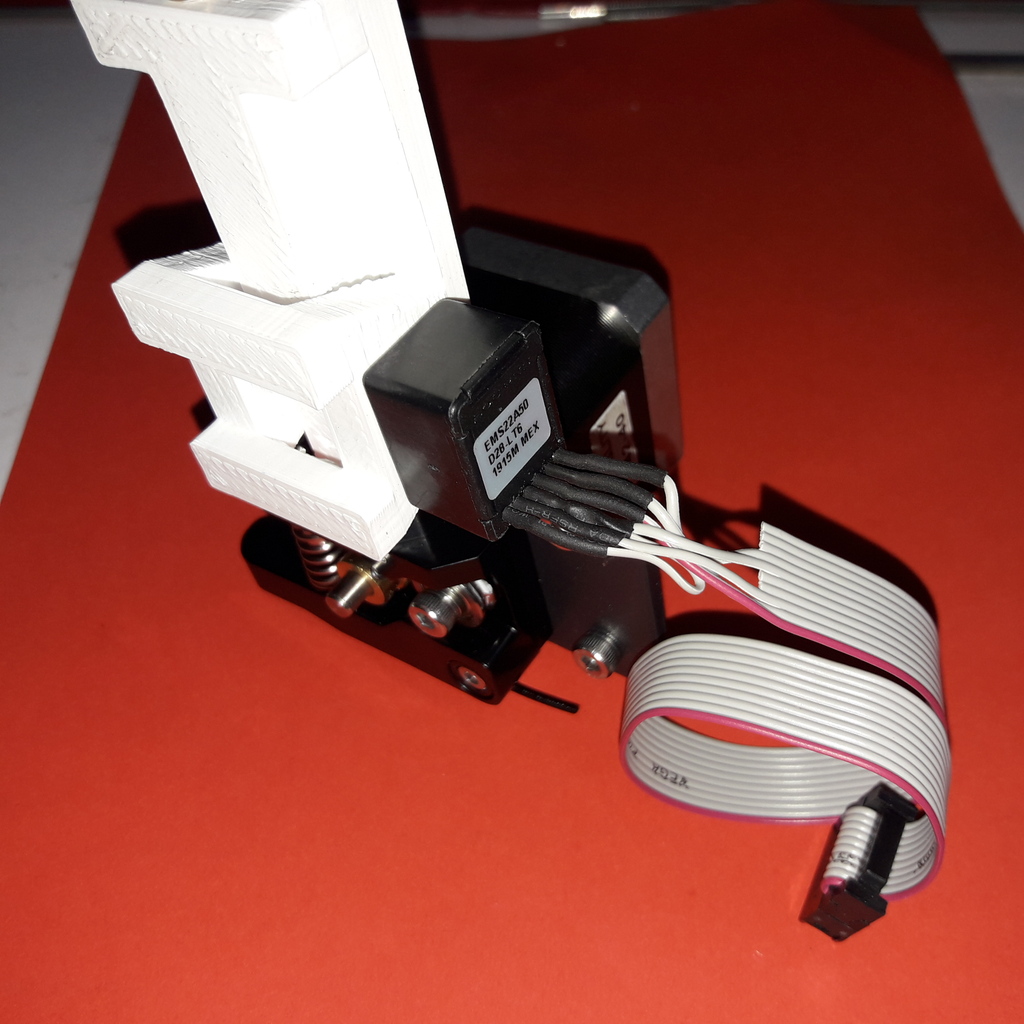
The flowrate sensor (FRS) is used to measure the movement of the filament. It consists of a incremental rotary encoder (Bourns EMS22) and a 3d printed housing. The axle of the encoder is pressed onto the moving filament using a spring that is part of the FRS housing.
The distance-information from the FRS is continuously read by the firmware and is used for several tasks:
- Compute the speed of the filament and the resulting volumetric flowrate (taking filament diameter into account).
- Compare the actual volumetric flow with the nominal volumetric flow to implement the flowrate-limiter.
- Automatically record material profiles.
- Automatically calibrate the feeder "esteps" (for the machine profile).
- Automatically calibrate the FRS (for the machine profile, too).
More details are here.
Bowden style printers only?
For best results, the flowrate sensor has to be placed after the feeder. This is easy for a bowden style printer.
For direct driver printers it should be possible but it is more difficult to add the flowrate sensor into the print head (because of space requirements, heat, added weight and so on).
Material Profiles
Material (filament) profiles are used for two things in ddprint:
- They define the hotend temperature necessary to melt a given volumetric flow of filament, see autotemp feature.
- The temperature-limiter uses the information in the material profile to slow down the print in cases where the hotend is not hot enough (yet) to melt the requestet amount of filament.
With other words: the material profile gives a picture of the hotend melting capacity for a given machine/filament combination - "the printer knows its filament".
A material profile for a given filament is created automatically by ddPrint and stored in JSON format for later use.
This filament-measurement is done in two steps:
- A best-case scenario where filament is extruded into air.
- And a worst-case scenario where a small testpart is printed under difficult circumstances (high backpressure because of 100% infill and small layerheight).
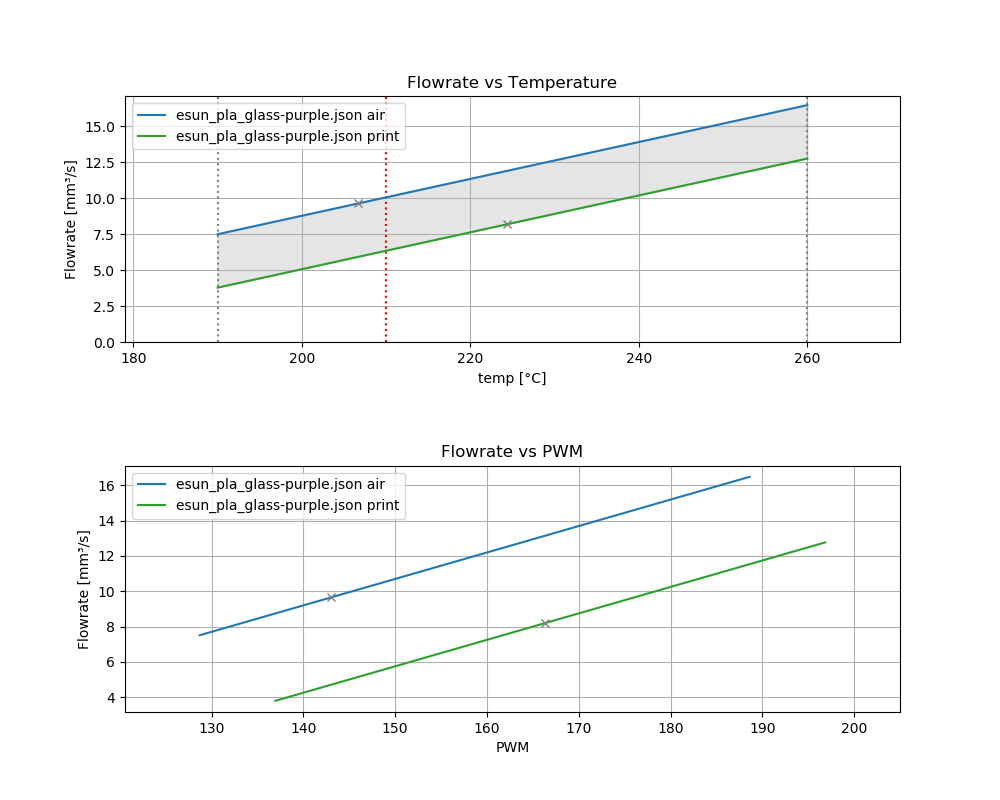
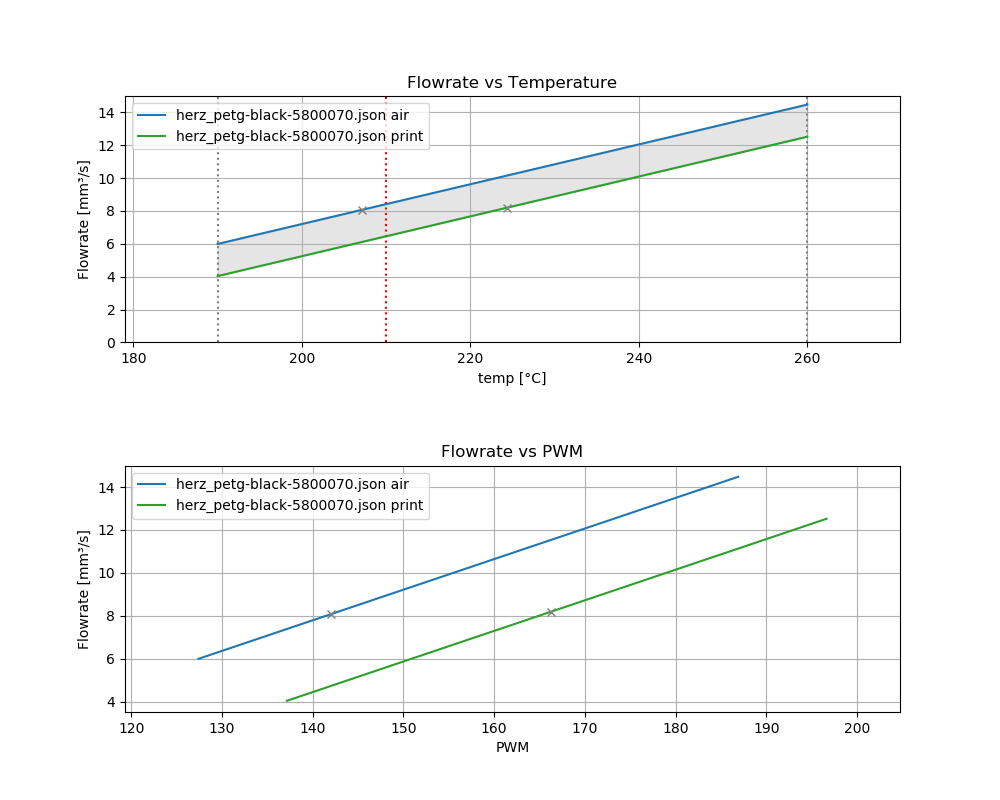
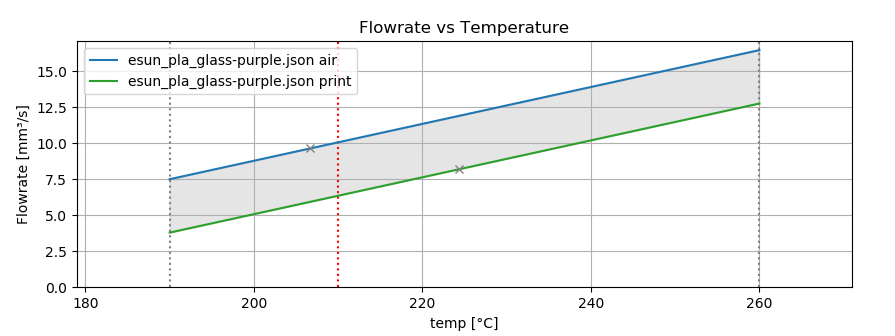
ddPrint comes with a python script to plot material profiles (plot_mat_profile utility). Here are two examples of material profiles, one for a PLA filament and one for a PETg filament:
For more details see here.
Auto Temp
While parsing/pathplanning the gcode input, the needed volumetric flowrate is computed. Then the required (minimum) temperature for this flowrate is determined using a (automatically measured) material profile of the used filament.
So when printing, the temperature of the hotend is dynamically changed in respect to the currently requested flowrate. This is done in a feed-forward manner because there is a delay between controlling the hotend heater and the change of temperature in the melting zone/nozzle, of course.
| Note: | because of this automatic temperature control, ddPrint ignores bed- and hotend-temperature related commands (M104, M140...) in the gcode input file. When slicing your models to be printed with ddPrint you can forget about all the temperature settings there. |
|---|
The hotend temperature follows the volumentric flow demand given in the input gcode file, is increased for parts of the model where high flow rates are required and vice-versa.
Temperature limiter
The firmware part of ddPrint running on the printer maintains a temperature-flowrate table. This table is downloaded from the host to the firmware before a print is done.
The temperature-flowrate table maps hotend temperatures to the max. volumetric flowrates (extruder speed) allowed at a given temperature (for the used filament). This table is generated from the information found in the material-profile of the used filament (see material profile) by the host part of ddPrint.
If the current hotend temperature is too low for the requested extrusion speed, the speed of the printer (feedrate) is scaled down so that it matches the achievable flowrate value in the table. This avoids underextrusion (thogether with filament-grinding) and the many problemns related to it.
This is called temperature limiting. The temperature-limiter works on a per-printing-move basis, that means this check and a possible slowdown is done for every straight line of the printhead (essentially for every printing gcode line).
With other words: The temperature-limiter together with the autotemp feature ensures that the hotend is always hot enough to be able to melt the requeste amount of filament.
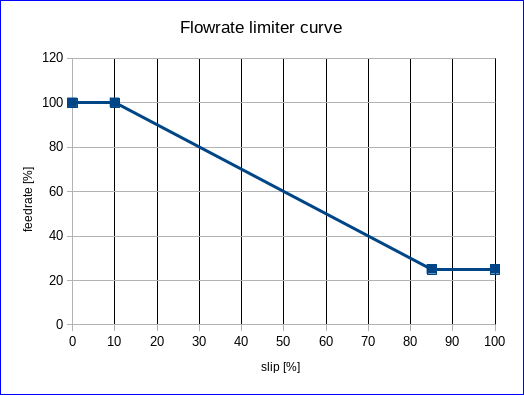
Flowrate limiter
Similar to the temperature-limiter the flowrate-limiter slows down the print to avoid underextrusion and grinding of the filament.
It starts to limit the feedrate when the feeder slip is above some threshold, so it uses the grip value measured by the volumetric flowrate sensor (FRS).
Up to 10% of feeder slippage (90% grip) is allowed before the firmware begins to slow down the print. Below 90% grip the feedrate is decreased linearly until reaches one quater (25%) of the nominal speed, see following plot.
More in detail
Flowratesensor
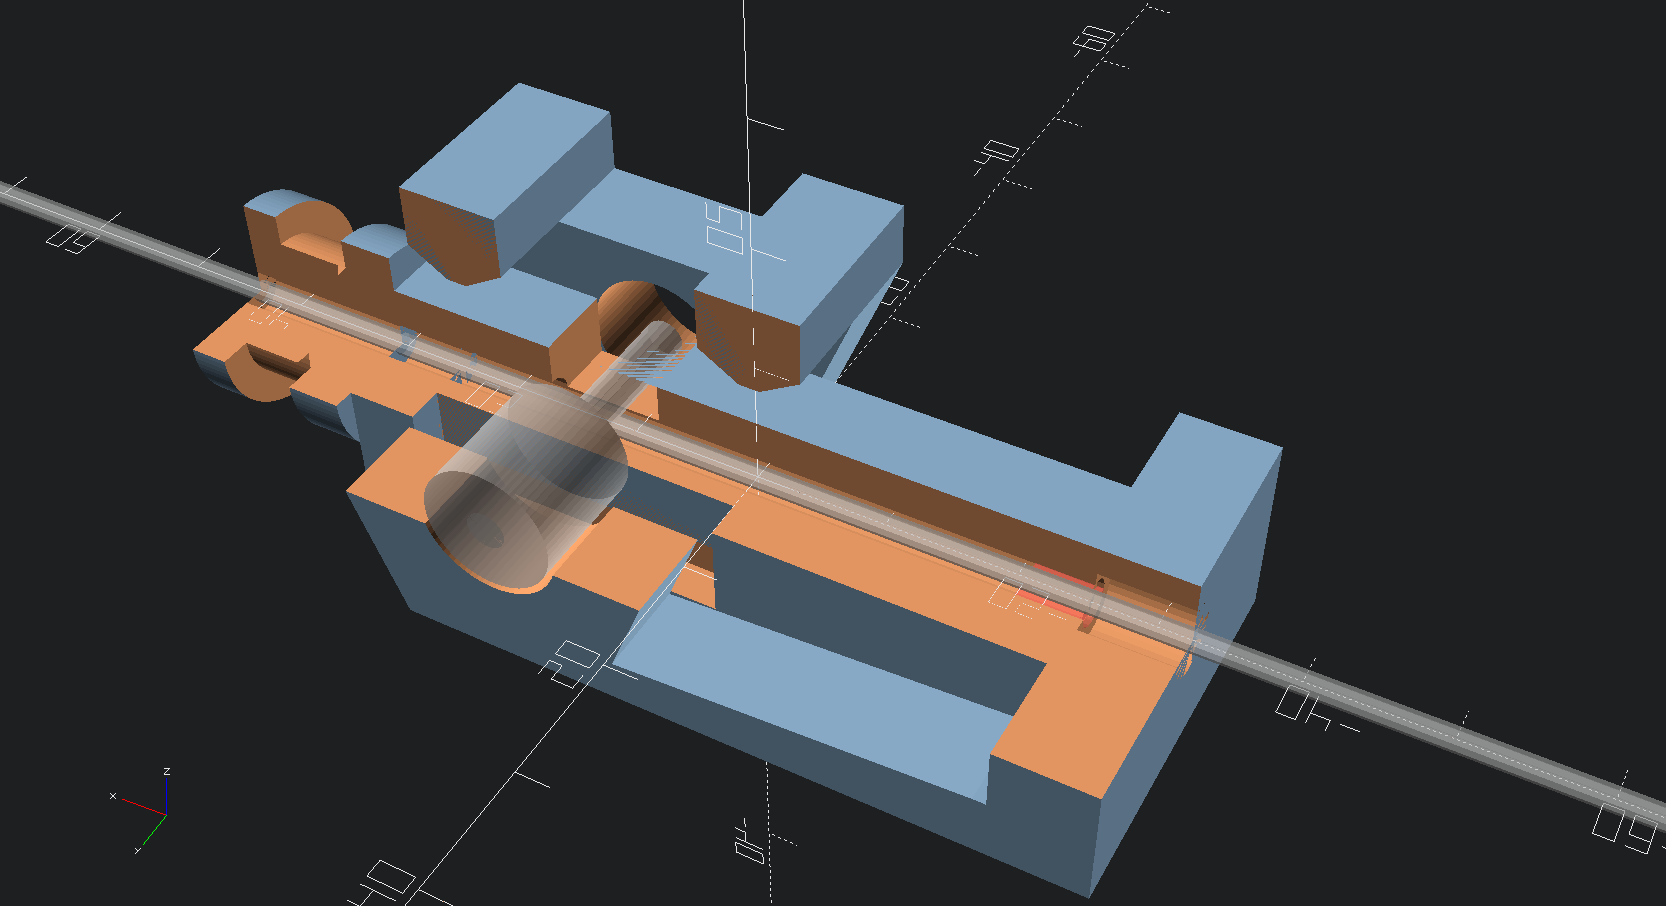
The FRS consists of the following components:
- A 3d printed housing (PETg).
- The incremental rotary encoder (EMS22).
- A ptfe inliner with a small cutout to allow the encoder axle to touch the filament.
- A pneumatic coupler to connect the extruder bowden tube to the FRS.
- Depending on the type of the feeder a short piece of a M6 heatbreak to mount the FRS at the feeder outlet.
- A cable to connect the FRS to the mainboard of the printer (SPI bus).
The EMS22 rotary encoder has a resolution of 1024 counts per revolution. The diameter of the axle is 3.17mm, this equates to a overall resolution of about 10µm (0.0097mm) of filament movement per count.
The nominal accuracy of the sensor is 0.7° (about 0.2%), worst case accuracy is 1.4° (about 0.4%). You can find a copy of the EMS22 datasheet (PDF) here.
The firmware reads the rotary encoder every 10mS, meaning a sample rate of 100Hz.
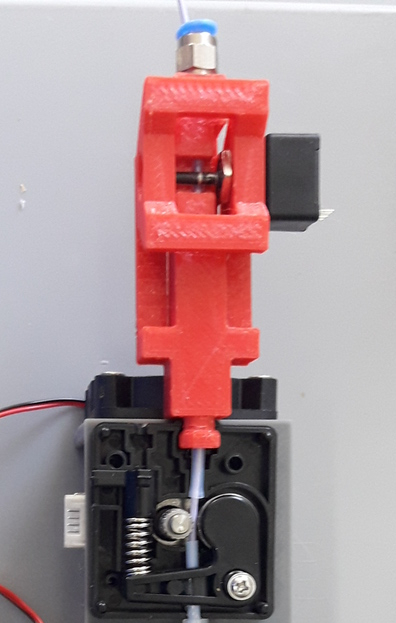
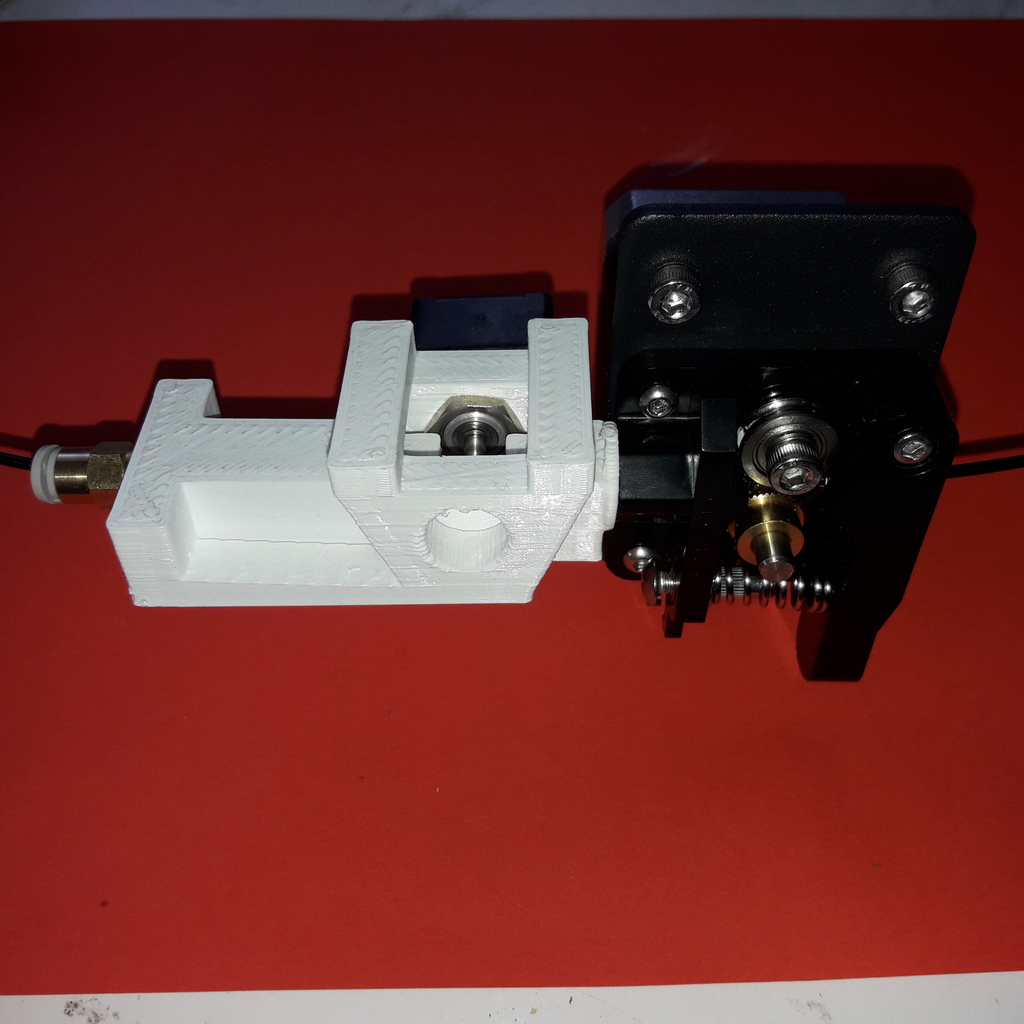
The FRS is mounted at the feeder outlet with an adapter that is part of the FRS housing (BMG or UM2 feeder) or with a short piece of a M6 heatbreak (Anycubic or Ender feeder) (todo: add bmg style picture).
Here are some STL files of the FRS housing.
Material Profiles
A material profile defines the "melting-capabilites" of a given machine/nozzle/filament combination. It is used by the ddPrint software to implement the autotemp and the temperature-limiter features. The material profile determines the volumetric flowrate at a given temperature and vice-versa.
Material profiles are generated automatically by ddPrint using the flowrate sensor. This measurement is done in two steps. This gives us a range of achievable volumetric flowrates for a given filament ("working field", the grey area in the profile plot).
In a first measurement the maximum volumetric flowrate for a given temperature is determined (blue line in material profile plot). This is done by extruding some plastic into-air, without any flow restriction of a printed part. This gives us a best-case flowrate.
The the other end of the flowrate range is measured doing a real print. In this case the flow through the nozzle is restricted by the part thats printed. The testpart is sliced using 100% infill and a very low layerheight. This gives us the worst-case flowrate (green line in material profile plot).
| Note: | To display a material profile graphically, use the plot_mat_profile utility. |
|---|
Into-air filament measurement
Into-air flowrate (blue line in plot above) is determined using the measureTempFlowrateCurve command of the ddPrint program.
To save filament, only two temperature/flowrate points are measured (P1 and P2). One at the lower end of the usable temperature range and one at the top end (for example, at 200° and 260°). The temperature-flowrate graph is then aproximated using this two points, they define a straight line equation y = M*x + C1.
The steps to measure into-air flowrate data are are:
- User loads the filament to test and starts measurement.
- ddPrint heats the hotend to the lower temperature.
- When start-temperature is reached, the PWM value of the hotend heater is fixed (PID temp control is disabled) and ddPrint starts to extrude filament at a low flowrate.
- Then in a loop, the flowrate is increased while watching the feeder grip.
- While increasing the flowrate, the feeder grip will decrease because of the rising backpressure from the filament pressed through the nozzle.
- At some point, feeder grip drops below a pre-defined value called minGrip, 90% for example.
- Flowrate is no longer increased, the first measurement point P1 is determined.
- PID temperature control is re-enabled and hotend is heated to the upper temp.
- When this upper temperature is reached, the measurement loop starts again. PWM is fixed and flowrate is increased while watching feeder grip.
- When feeder grip falls below minGrip the second time, we have determined the second measurement point P2.
- Hotend is switched off and the speed of the extruder is gracefully decreased until stop.
- The final step is to compute the values of M and C1 and write the into-air flowrate data to a material profile template file.
Real print filament measurement
This is similar to the into-air measurement, but this time doing a real print. The result is the worst case flowrate data (the green line in the plot above).
The ddPrint command for this measurement is measureTempFlowrateCurve2.
Again a straight line equation y = M*x + C2 is determined. To save filament, only one temperature/flowrate point is measured (P3). As a simplification, we assume the same slope as in the into-air measurement.
The test-part printed is designed and sliced as follows:
- The part is tall to quickly gain height, this is to minimize the heating influence of the heated bed.
- It is long in one direction to help the flowrate measurement (long straight lines with constant extrusion, minimize acceleration effects).
- It is sliced with 100% infill for high nozzle backpressure.
- It is sliced with a small layer-height for high nozzle backpressure.
- It is sliced with a high feedrate, again for high nozzle backpressure.
| Note: | The test-part is not printed to its full height, measurement will stop before. |
|---|
The steps to measure printing flowrate data are are:
- Filament to test is loaded, printer is prepared to do a print and user starts measurement.
- ddPrint heats the hotend to a temperature in the middle of the usable temperature range.
- When start-temperature is reached, the PWM value of the hotend heater is fixed (PID temp control is disabled) and ddPrint starts to print the testpart using a low speed/flowrate.
- Print until some height is reached to minimize heating bed effects.
- Then in a loop, the flowrate is increased on every layer while watching the feeder grip.
- While increasing the flowrate, the feeder grip will decrease because of the rising backpressure from the filament pressed through the nozzle (additionally restricted by the part thats printed).
- At some point, feeder grip drops below a pre-defined value called minGrip, 90% for example.
- Measurement ends, datapoint P3 is determined.
- Print is gracefully stopped.
- The final step is to write the printing flowrate data (together with the into-air data) to a material profile template file.
After editing the newly measured material-profile (.json file) it can be renamed and stored somewhere in a profiles folder for later view (plot_mat_profile utility) or use (printing).
Workingpoint (strength) parameter
The autotemp feature splits the print into segements and determines the necessary temperature for theese segments using the given material profile. It then adds the corresponding temperature control commands into the datastream sent to the printer. This is done in a feed-forward fashion, the temperature is set some time before the segment is printed.
When looking up the needed temperature in the material profile, the following question arises: Which temperature should be used, the one belonging to the into-air measurement, the one from the real-print measurement or a temperature somewhere in between?
The next picture illustrates this. In this example, we want to know the necessary temperature for a volumetric flowrate of 9 mm³/s (pink horizontal line).
As we can see, the into-air temperature for this flowrate would be 202 °C (T1) and the real-print temp is 231 °C (T0).
This is where the workingpoint parameter comes into play. The workingpoint (WP) parameter tells ddPrint which temperature to choose. WP is a value in the range 0...1 an can be specified as a commandline parameter or through a experimental G-Code command (M901). When WP is 0 then the temperature belonging to the real-print graph is used and when WP is 1 then the into-air temperature is used. Other values of WP use the according temperature between T0 and T1.
The default value of WP is 0.5, the corresponding graph looks like this:
With WP=0.5, the autotemp feature of ddPrint uses temperatures in the middle of the two graphs, the corresponding function is shown as the brown linegraph. Hotend temperature for flowrate 9 mm³/s in this case is 216 °C.
With other words, with the workingpoint parameter we can:
- Control the temperature level the autotemp feature is using througout the print.
- Control the quality of the print, look VS strength tradeof.
WP values towards zero are increasing the temperature level, resulting in better layerbonding and stronger parts (good for functional parts). WP values towards one are lowering the resulting temperatures, resulting in a better look of the printed parts (better for figurines and the like).
Two examples with a volumetric flowrate of 9 mm³/s and working points 0.3 (hotter than default WP 0.5) and 0.8 (cooler than default WP 0.5):

When workingpoint value is set to zero, then the real-print measurement graph is used (brown linegraph laying on the green graph). Accordingly when WP is one, the into-air measurement grap is used (brown linegraph laying on the blue graph).
TBD: note about PWM values/graph, link to think in terms of energy.
Think in terms of energy
TBD: think more in terms of energy (hotend PWM) instead of temperature.
Profile plotting utility
TBD: describe plot_mat_profile utility.
usage: plot_mat_profile.py [-h] printer nozzle mat smat [smat ...]

plot_mat_profile.py - plot ddPrint material profiles.

positional arguments:
  printer     Name of printer to select profiles.
  nozzle      Name of nozzle profile to use [nozzle40, nozzle80...].
  mat         Name of generic material profile to use [pla, petg...].
  smat        Material profile(s) to plot.

optional arguments:
  -h, --help  show this help message and exit
FDM 3d printer firmware with host preprocessing and closed loop E
See last chapter in this document for a log/history.
3d printer firmware for cartesian FDM printers (ultimaker clones, atmega and stm32, like um2, ramps or jennyprinter).
This firmware is part of the ddprint printing system, which immproves a common FDM printer by a closed loop E-Axis: http://www.ibrieger.de/close_the_loop_for_e.html.
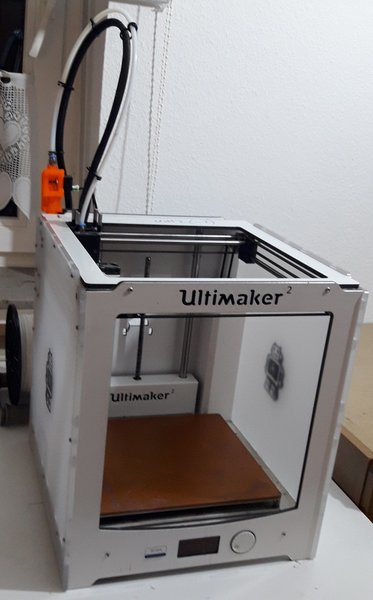
Reference printer is a Ultimaker 2 with ddprint installed and some hardware modifications: http://www.ibrieger.de/pimped-ultimaker-2.html, and a jennyprinter X340 now too.
Github Mirror, project Homepage
DDPrint FDM firmware: github.com/ErwinRieger/ddprint, mirrored here: http://www.ibrieger.de/ddprint-3d-printer-firmware.html.
DDprint system project homepage: ibrieger.de/close_the_loop_for_e.html.
Video: http://youtu.be/1Kbl9AZd10Y, ddprint playlist: http://www.youtube.com/playlist?list=PLzn7lnnZpS7XP-JhLw_o7p27ayv5bJ29o.
HackadayIO project: http://hackaday.io/project/170695-ddprint.
Current state
Works for me.
Key features
- Uses a incremental sensor to measure extruder flowrate at realtime to "close the loop for E". This limits the speed of the printer if feeder tends to slip.
- Automatic measurement of feeder system caracteristics for calibration.
- Automatic measurement of filament caracteristics to create filament profiles .
- "Auto temperature algorithm": hotend temperature depends on the gcode-requested flowrate.
- "Temperature-flowrate-limiter": speed of printer is limited if hotend has not (yet) the right temperature for the requested flowrate.
- Extruder pressure advance, of course ;-)
Main part is the Flowrate Sensor realized with a Bourns EMS22AFS incremental encoder.
Installation
Firmware part
Requirements, dependencies
- Arduino code/libraries and avr compiler
- Arduino-Makefile
Install them along the checked out ddprint sources so that the directory structure looks like this:
.
├── ddprint
│   ├── LICENSE
│   ...
├── arduino-1.6.13
│   ├── arduino
│   ...
├── Arduino-Makefile
│   ├── Arduino.mk
│   ...
The following versions are used at the moment (maybe newer versions will also work):
Arduino IDE 1.6.13, installed from downloaded archive.

Arduino-Makefile from http://github.com/sudar/Arduino-Makefile.git
    commit c3fe5dcc2fbd5c895b032ca5a5a1f60af163b744
    Merge: 7a26a86 6d3d973
    Author: Simon John <git@the-jedi.co.uk>
    Date:   Thu Dec 28 18:05:18 2017 +0000
Build and upload firmware
| Note: | keep a backup of your previous firmware in case you want to go back. |
|---|---|
| Note: | ddPrint does not use EEProm. |
For a ultimaker UM2 do:
make -f Makefile.fw
make -f Makefile.fw do_upload
For a ramps based printer do:
make -f Makefile.ramps
make -f Makefile.ramps do_upload
| Todo: | Add info about configuration. |
|---|
Host part
Requirements:
- apt-get install python python-serial
- pip install npyscreen vor the TUI (ddprintui.py)
No installation procedure yet, checkout the repository and run ddprint.py or ddprintui.py from the ddprint/host subdirectory.
Configuration
Parts of printer configuration hardcoded in firmware, parts come from printer profile at runtime.
| Todo: | describe configuration. |
|---|
Only one setting stored in printer: the printer name.
| Todo: | describe printer name setting. |
|---|
Gcode input
Easier slicing, simple gcode
| Note: | Simplify3d is used as of this writing. |
|---|
Use mostly plain gcode with ddprint, many of the advanced features of the slicers (like coasting or acceleration control) are not needed, see http://www.ibrieger.de/close_the_loop_for_e.html#simpler-gcode.
The (automatically measured) material profile gives a picture of the hotend melting capacity for a given machine/filament combination. This eases the determination of a good printing speed.
Simplify3d example slicer settings in http://github.com/ErwinRieger/ddprint/tree/master/examples/s3d_profiles.
| TODO: | note that PrusaSlicer and SuperSlicer are used, too. |
|---|---|
| TODO: | note about S3D profile generation from templates: http://github.com/ErwinRieger/ddprint-profiles/tree/main/s3d-profiles |
Supported gcodes
Todo
Usage, Commandline Interface
Machine setup and calibration
setPrinterName
Store printer name in printer's runtime config (on mass storage device):
./ddprint.py setPrinterName UM2-1
See also: getprintername command.
calibrateESteps
Machine setup and calibration: Automatically determine extruder e-steps value for printer profile:
./ddprint.py calibrateesteps
Explanatory screencast:
calibrateFilSensor
Machine setup and calibration: Automatically determine flowrate sensor calibration value for printer profile:
./ddprint.py calibratefilsensor
Explanatory screencast:
Autotune hotend PID, autoTune
Run PID autotune to determine the hotend PID parameters:
./ddprint.py autoTune petg_1.75mm
cd pid_tune
PYTHONPATH=.. ./pidAutoTune.py ../autotune.raw.json
bedLeveling
| Todo: | describe command |
|---|
Material measurment
Measure material profile, measureTempFlowrateCurve
Extrude some filament into air and measure the material properties (melting capacity, temperatures) of this machine/filament combination.
./ddprint.py measureTempFlowrateCurve nozzle80 petg_1.75mm 2.5
Measure material profile, measureTempFlowrateCurve2
Second step to measure the material properties (melting capacity, temperatures) of this machine/filament combination doing a real print.
TBD: update section
./ddprint.py measureTempFlowrateCurve2 ...
Printing
home
./ddprint.py home
insertFilament
Heat hotend and start filament insertion process.
./ddprint.py removeFilament petg_1.75mm
Preprocess gcode file, pre
Preprocess a gcode file, this parses the given gcode file and runs all processing steps without actually sending anything to the printer. Used for development, debugging and to check if a given gcode file can be processed by ddprint.
./ddprint.py -smat esun_petg_transparent-orange-6-922572-263079 pre UM2-1 nozzle80 petg_1.75mm quader_10x20.gcode
Print gcode file, print
Print a gcode file with the commandline tool:
./ddprint.py -smat esun_petg_transparent-orange-6-922572-263079 print nozzle80 petg_1.75mm quader_10x20.gcode
Misc commands
disableSteppers
Switch off stepper current, printer no longer homed after that.
./ddprint.py disableSteppers
Monitor status, mon
Machine status: The ddprint mon command is a combination of the ddprint getstatus and the ddprint top command. They are called periodically until the ddprint mon command is terminated (using Control-C).
./ddprint.py mon
Explanatory screencast:
heatHotend
| Todo: | describe command |
|---|
Read printer name from printer, getPrinterName
Read printer name from printer, stored on mass storage device (sdcard, usbmemory).
./ddprint.py getprintername
getStatus
Machine status: The ddprint getstatus command is used to query the current state of the printer.
A short form of this commmand is the ddprint stat command.
./ddprint.py getstatus
# Or
./ddprint.py stat
Explanatory screencast:
Firmware task status, top
Machine status: The ddprint top command is used to query statistics about the timing of the tasks running in the firmware.
It is used to profile the firmware and to check if the mass storage device (sdcard or usb-storage) is fast enough.
./ddprint.py top
Explanatory screencast:
Usage, Userinterface (TUI)
Print a gcode file with the TUI:
./ddprintui.py -smat esun_petg_transparent-orange-6-922572-263079 nozzle80 petg quader_10x20.gcode
Some implementation notes
Host side preprocessing and stepgeneration
The software is split into two main parts:
- The host part where the cpu intensive work (gcode preprocessing, path planning, lookahead, acceleration, advance...) is done. The host part is written in Python.
- And the firmware part that runs on the ATMega Controller in the printer. This part executes the move commands from the host and does other things like the temperature control of the printer.
- Host software and printer firmware are connected through the usual atmega rs232 USB emulation.
Use printers SD card as a swap device
To overcome the limited memory of the atmega, the unused SD card is converted to something like a swap device: It buffers the received data. This decouples the USB transfer and actual use of the received data, too. The SD card is used in 'raw/blockwise mode' without a filesystem on it.
Working SD cards
Not all cards are working in SPI mode, some fail to initialize, some freeze after some time. See http://github.com/greiman/SdFat/issues/160, also.
Some working ones:
- The ones that come with your printer should work.
- SandDisk, 2Gb, SD
- SandDisk, 2Gb, Micro-SD
- SandDisk, 4Gb, SDHC, Class 2
- SandDisk, 4Gb, SDHC, Class 4
Not working ones:
- MediaRange, 4Gb, SDHC, Class 10
Protothreads
The firmware part is implemented using the great protothreads library: http://github.com/benhoyt/protothreads-cpp, thanks for this work.
Other
- Look ahead path planning with linear acceleration ramps.
- Hardened USB communication using COBS encoding and CCITT checksums in BOTH directions.
- Simulator mode for testing/development: Firmware runs as a host-program with serial communication over a ptty device.
- Debugging: plot/display generated acceleration ramps
Things todo, nice to have
- Improve documentation, examples, videos.
- Cleanup and stabilisation, make binary releases.
- Other convenient things like automatic bedleveling and so on.
Thanks
Thanks to all open/free software people that make this all possible.
Unsorted
This has to be included into the documentation:
Installation, dependencies, note about ddinstall.sh
sudo apt-get install python3-serial python3-numpy
avrdude for arduino based firmware upload
stm32flash for stm32 based (jennyprinter) firmware upload
Log
Wed Jan 26 18:38:29 CET 2022
----------------------------

* Github: merged *next* branch into *master*.
* Setup page with some notes about ddPrint on a Anycubic I3 Mega (S): http://ibrieger.de/ddprint-anycubic-i3.html
* Uploaded new sensor housing stl's, reworked stl naming scheme (http://github.com/ErwinRieger/ddprint/tree/master/stl).
* Added simple install script (ddinstall.sh) and a script for firmware flashing (dd-fw-upload.sh).
* Added firmware blobs (firmware/build\*/\*.hex)
* Include ProtoThreads library (github.com/benhoyt/protothreads-cpp.git) into ddPrint repository for easier firmware build.

Mon Jan 17 17:45:47 CET 2022
----------------------------

Committed the following changes into the *next* branch on github:

+ Python3 port of ddPrint:
    * Converting python files with 2to3 script.
    * Fix integer divisions.
    * Use bytes() and bytearray() instead of strings for binary
      data.
    * Converted scripts and 'ddtool' utility to use python3.

+ Ported ddPrint to Anycubic I3M printer:
    * Pin changes for anycubic i3m.
    * Add support for ATC Semitec 104GT thermocouple.
    * Rework temperature measurement: allow
      different thermocouple types for heated bed
      and hotend.
    * Homing: add support for additional Z1 stepper motor and endstop.
    * Homing: implement dual-z homing.
    * Adjust getendstops command for the additional Z-endstop.
    * Control mainboard cooling fan (anycubic i3m).
    * Changed initial baudrate to 500 kbaud, 1 Mbaud is to fast for
      Anycubic i3m.
    * Auto-baudrate: added new printer profile setting
      'baudRateLimit' for the Anycubic i3m (it does not work
      with 1 Mbaud baudrate).
    * Rework and cleanup ddPrint scripts: Added workaround for
      a problem with the linux cp210x driver used for the
      Anycubic i3m (CP2102 usb-serial chip): avoid reset of
      printer on device-open (cp210x seems to toggle DTR line
      even if '-hupcl' is used).

+ Other changes:
    * Environment: renamed env. var $DDDEVICE to $DDPRINTDEV.
    * Firmware build: Set ARDUINO_PORT from DDPRINTDEV environment var.
    * Added new command "continuosmove" for testing, allow
      simple movements of the printer (without homing) for
      debugging/initial setup.
      Note: no acceleration and no endstop-check - dangerous.
    * Removed unused baudrate commandline switch.
    * Cleanup handling of printer-device ($DDPRINTENV).
    * Firmware: moved pins include files into its own folder.
    * Improved plot_mat_profile.py scipt: use python-argparse, display
      more information.

Sat Jan  1 10:45:26 CET 2022
----------------------------

* Merged next into master, biggest change: ported ddPrint to use python3.

Thu Dec 30 14:53:31 CET 2021
----------------------------

* Merged python3 port into next branch.
* Restructured project, moved test gcode files into it's own
  repository: http://github.com/ErwinRieger/ddprint-test-gcode.
* Build: cleanup Makefiles, added license and moved firmware
  Makefiles into its own folder. Moved common makefile stuff
  into include files.

Tue Dec 21 14:40:15 CET 2021
----------------------------

Project updates on github.com:ErwinRieger/ddprint:

Documentation:

* Describe material profiles in more detail.
* Describe automatic material profile measurement,
  determine *into-air* and *printing* volumetric flowrate data.
* Update section about temperatuer-limiter.
* Update section about flowrate-limiter.
* Added more pictures and data plots.

Code fixes:

* Auto-temp: fix workingpoint commandline parameter, worked the wrong way.
* Preload: test another way to compute amout of data to pre-download
  to the printer, simply count small moves.
* Some cleanup.

Tue Dec  7 10:41:32 CET 2021
----------------------------

Did some project updates on github.com:ErwinRieger/ddprint:

* Some smaller code fixes and code cleanup.
* plot_mat_profile script: cleanup and improved display
   of material profiles.
* Documentation update (README):
   + Update section about auto-temp feature.
   + Added information in flowratesensor section.
   + Added flowratesensor details section.
   + Added information in material profile section, added some example plots.
   + Added example plots of material profiles.
   + Added more images.

Mon Nov 15 19:41:23 CET 2021
----------------------------

Added explanatory asciinema screencast for the following ddPrint commands:
* ddprint getstatus (shortform: ddprint stat)
* ddprint top
* ddprint mon

Tue Oct 19 22:19:57 CEST 2021
-----------------------------

Drafted a page with some notes about installing ddPrint on an
Ender5 (pro): ibrieger.de/ddprint-ender-5.html


Fri Oct 15 18:32:30 CEST 2021
-----------------------------

Merged *next branch* into master with the following changes:

Porting ddprint to Ender5 (pro):

  * Changes for the Creality melzi board (atmega1284p based).
  * Added thermistor table for epcos 100k ntc.
  * Declared IO-pins in firmware/pins_ender3.h
  * Rework homing:
    + use feedrate and direction for homing from printerprofile.
    + Move away from nozzle after z is homed (for printers that
      home at z=0. This is to avoid scratching over the bed when
      homing X and Y.
    + Homing: added "4 point mode" for ender.
  * Added new script *thermistor_table.py* to generate thermistor
    tables (c-code).

Other changes:

  * Host: rework *getstatus* and *mon* commands.
  * Host: filament profile measurement:
    + measure2: increase printing speed with fixed
      temperature while monitoring feeder grip.
    + measure2: changes to reduce heating effect of
      heated bed, start measurement on fifth layer.
    + specify minimum grip value on commandline (instead of
      hardcoded value).
    + write measured material profile to ./mat-profile2.add.
  * Host, *removefilament* command: changed feeding
    sequence to avoid filament plug.
  * Host, Experimental: added *reconnect* command.
    To reconnect to a running printer, works after
    download is complete, but not if disconnected
    while downloading stepper data.
  * Host: Added *ddprint version* command.

  * Firmware: cleanup flowrate measurement,
    measure short moves, too.
  * Firmware: added CmdGetVersion command.
  * Firmware, Makefile: new target *make gitversion.cpp*
  * Firmware: set printer state to idle if steppers are
    disabled (cmd *disablesteppers*).
  * Firmware: Update to SdFat-1.1.4 library (USE_SD_CRC enabled).
  * Firmware: Rework mass storage erase: new commands CmdGetCardSize
    and CmdErase. Call erase before printing.
  * Firmware: Sd card init: retry up to 5 times.

  * Many smaller fixes/improvements


Fri Oct 15 13:18:01 CEST 2021
-----------------------------

Reworked flowrate sensor housing:

 * Rotated design to shorten filament path between
   feeder gear wheel and rotary encoder for better response.
 * Made it i bit more compact.

STL files are here: github.com/ErwinRieger/ddprint/tree/master/stl
See some images here: github.com/ErwinRieger/ddprint/blob/master/images


Fri Jun 25 09:49:51 CEST 2021
-----------------------------

Merged *next* branch into master, changes are:

* Flowrate/grip measurement:
* Added a experimental reprap usbserial interface using a pseudo-tty to use OctoPrint
  as a frontend for ddPrint. Not much functionality yet: display temperatures and some
  SD card commands (stubs).
* Flowrate limiter: max. slowdown now four times instead of 16.


Wed Jun 16 23:47:01 CEST 2021
-----------------------------

Current development (cleanup, minor fixes, documentation) is done on *next* branch.
Added asciinema screencast to show how to use ddPrint.


Wed Jun  9 21:17:22 CEST 2021
-----------------------------

Merged *fix-avr* branch into master.


Tue Jun  8 14:41:41 CEST 2021
-----------------------------

Pushed fix-avr branch to github. The JennyPrinter port made the avr/atmega side to slow.
Changes are:

* Integer math instead of floating point.
* Reworked usb-serial interface: store 512byte blocks.
* Removed compression with zlib, the avr has not enough cpu cycles.
* Experiment: auto-baudrate. Switch between 1000000, 500000 and 250000 baud.
* SDReader: double-buffering.
* Many other improvements and cleanup.

So for now, fix-avr is the branch to use for avr/atmega based printers and master is for
the stm32 JennyPrinter. Branch fix-avr has will be merged into master.